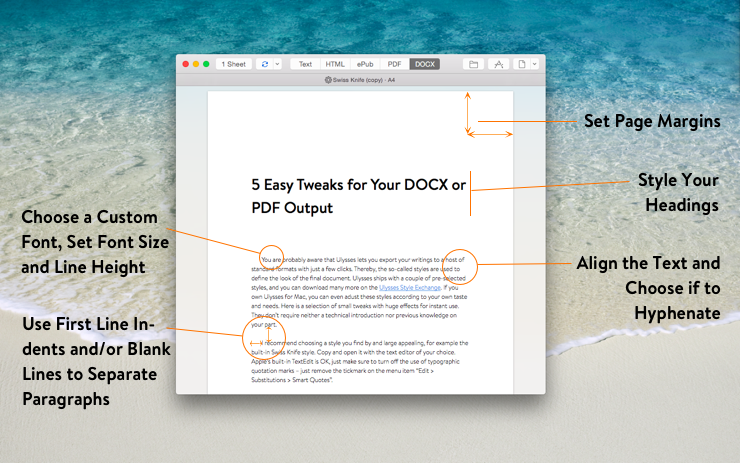
You are probably aware that Ulysses lets you export your writings to a host of standard formats with just a few clicks. Thereby, the so-called styles are used to define the look of the final document. Ulysses ships with a couple of pre-selected styles, and you can download many more on the Ulysses Style Exchange. If you own Ulysses for Mac, you can even adjust these styles according to your own taste and needs. Here is a selection of small tweaks with huge effects for instant use. They neither require a technical introduction nor previous knowledge on your part.
I recommend choosing a style you find by and large appealing, for example Swiss Knife, which is built in. Copy and open it with the text editor of your choice. Apple’s TextEdit is OK, just make sure to turn off the use of typographic quotation marks – untick the menu item “Edit > Substitutions > Smart Quotes”.
Basically, a Ulysses style sheet determines parameters for certain text elements – no magic is required. Please don’t forget to save all changes you make. Ready to go?
1. Font Type, Font Size, Line Height
To change the default font type, scroll down to the selector defaults. It is followed by your document’s default settings, enclosed in curly braces. Simply complement the term font-family with the font of your choice (just make sure that it is actually installed on your Mac). You can also determine font-size and line-height here.
defaults {
font-family: "Brandon Text Light"
font-size: 12pt
line-height: 18pt
}
2. Alignment + Hyphenation
If applicable for the whole document, these are also set in defaults. You can set the text-alignment to either left, right, justified or center. Hyphenation can be turned on (yes) or off (no).
defaults {
text-alignment: left
hyphenation: no
}
You can override the default settings down the line, for example for headings or footnotes.
3. Printing Margins
Look for the selector document-settings: Here you can set the printing margins of your PDF or DOCX document. The respective variables are page-inset-top, page-inset-bottom, page-inset-inner and page-inset-outer. In an one-sided layout, “inner” refers to left, and “outer” refers to right.
document-settings {
page-inset-top: 30mm
page-inset-bottom: 45mm
page-inset-inner: 30mm
page-inset-outer: 30mm
}
4. First-Line-Indents
It is quite common to indent the first line of every paragraph in order to improve the readability of a text. Add or adjust the following snippet for setting a first-line-indent.
paragraph {
first-line-indent: 20pt
}
Tip: You can also use cm, mm, in, even em as unit here.
Some writers (like me) prefer to separate paragraphs with blank lines. If you do, too, copy-paste the following snippet, or adjust it if it is already there.
paragraph + paragraph {
margin-top: 18pt
}
By this, you indicate that any paragraph following another paragraph will get a top margin of 18 pt.
5. Headings
Let’s have a short look at how to adjust headings, since they’re commonly used by any kind of writer. There is a selector called heading-all that lets you specify joint settings for all heading levels, for example a dedicated font.
heading-all {
font-family: "Brandon Text Medium"
}
Then you can specify the individual settings for every single heading level: the font size, the line height, margins etc. Note: You’ll only have to specify the settings you want to be different from the text’s default settings or the adjustments you just made for all headings. Here’s an example for a second level heading: In DOCX or PDF, it will be set in 24 pt, bold, with a margin of 48pt at the top, and 12pt at the bottom.
heading-2 {
font-size: 24pt
font-weight: bold
margin-top: 48pt
margin-bottom: 12pt
}
Outlook
There’s a lot more, very specific stuff you can do with styles, but I think if you're having average requirements (in terms of formatting options, not quality!) these steps will lead you pretty far. What is really cool is that you can use the style you just created for anything you’ll ever write with Ulysses. So it was worth the sweat, wasn’t it?
If you want to learn more, check out our documentation for Ulysses Style Sheets. Should any problems arise, after all, don’t hesitate to get in touch with our support – we’re happy to help.